I started making cakes about 4½ years ago. At first it was just as a hobby, making them only for family birthday parties or my closest friends – maybe one or two cakes a month. As I perfected my skills, word started to spread. I went from making a cake a month, to as many as 5 a week! Working a full time job, and doing that many cakes started to take its toll. About a year ago, I began saying “no” more often and I gradually decreased to 2-3 cakes a week. This number was manageable but I still never had a weekend to myself. Then 6 months ago, I said “no” all together.
Until last week…
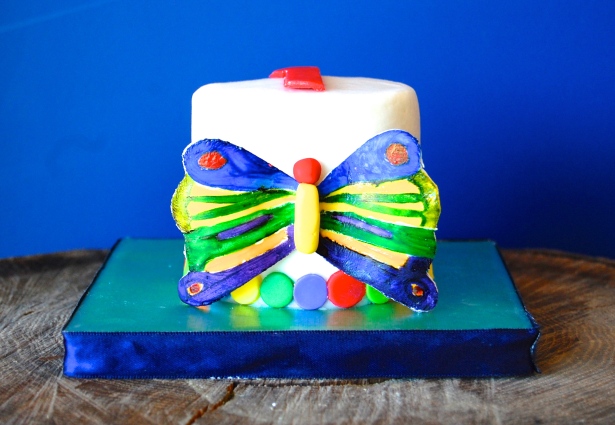
Last week I made this Very Hungry Caterpillar cake for a friend of mine from back home. It was her daughter’s first birthday, and I COULD NOT say no to this theme. I am so happy with the result, and it felt so good to be creative again.
When I started this blog, I promised cake tutorials. Welp, let’s start with basics.
Prep before baking.
This step is so important. There is nothing worse than mixing up your batter, baking your cake, and your cake sticks to the pan. I take that back, this is second to running out of icing – that is actually the worst. LINE YOUR PAN WITH PARCHMENT PAPER. I’m shouting if you can’t tell, it’s that important. Here is how I make my parchment circles:
- Piece of parchment
- Fold in half horizonatlly (we are going to call this fold center)
- Turn your horizontal half vertical (center will be on left); fold in half again (bottom to top).
- Take your bottom (right) corner (opposite of center) and fold to the top center corner (left) – you’ll end up with a triangle.
- Repeat the same fold – bring the right side of your triangle to meet the left. You’ll end up with a tighter triangle.
- Place the tip of your triangle in the center of the pan to measure.
- Cut along the edge of your pan.
- Voila! Perfect parchment circle.
I promise this is so much simpler than the directions sound. Try it! You’ll see.
Even with the parchment rounds, use non-stick spray in your pan. Place the round in, maybe give the pan another quick spray, and then add your batter.
Leveling and filling:
Your cakes are now baked and should come out of your pan cleanly. Next up, leveling and filling. It’s über important that all of your cakes are the same thickness. You can eye ball it with a bread knife, or Walmart and most craft stores carry a $10 cake leveler by Wilton. Go ahead and cut off those cake tops! This is The Carnivore’s favorite part. I’ve been known to find him with a plate of cake tops and a piping bag… I think I have a picture somewhere as evidence.
Now this is where our steps might differ. Most of the time I am making either fondant covered cakes, or buttercream with fondant decorations. If you’re making a pretty cake for home you won’t use two different icings here. For me, I like to use a shortening based icing on the exterior of my cakes and as a dam around the layers. I do this for 3 reasons:
- It doesn’t melt like butter based icing, so it holds up well at a party for hours.
- It keeps the butter based filling locked in, so it doesn’t create bulges in my fondant.
- It doesn’t melt like butter based icing.
If you aren’t making an elaborately decorated cake, just use whatever icing you prefer on the whole thing.
- Place the first layer on your cake board FACE UP, pipe a dam around the edges of your cake, and then fill with your filling icing, or just keep piping in circles until the cake is completely covered.
- Place the second layer FACE DOWN. Continue the same process as above.
- Place the third layer FACE DOWN.
At this point I like to wrap my stacked cake in plastic wrap to let it rest. Cakes naturally settle, and I DO NOT want my cake to settle once it’s decorated. I will let it rest (covered) for about 4 hours to overnight. Sometimes I’ll even put a little weight on it to help the process – something like a cake board with a bag of chocolate chips on it, just a little weight to speed things up. I’ll let my cake sit at room temp. for about an hour and then move it the fridge, so the filling gets nice and set. Again, if you are not doing an elaborately decorated cake just ice that thing and eat it! No need to wait overnight to enjoy your sweets. 🙂
We’ll discuss icing your cake and how to get a nice, smooth finish later. Feel free to post any questions in the comment section. I’m off to yoga.
I leave you with a quote from Julia Child. Enjoy!


I’ve enjoyed the instructions for cake decorating. I’m planning on making my twin grand babies 1st birthday cake the end of April. Would defiantly appreciate more tips! Thanks!